The “Repair works” page holds the repairs of machines, equipment and work objects: work that does not come from the maintenance schedule but from a fault or from a defect found during maintenance. The page is used by the people responsible for maintenance and by mechanics.
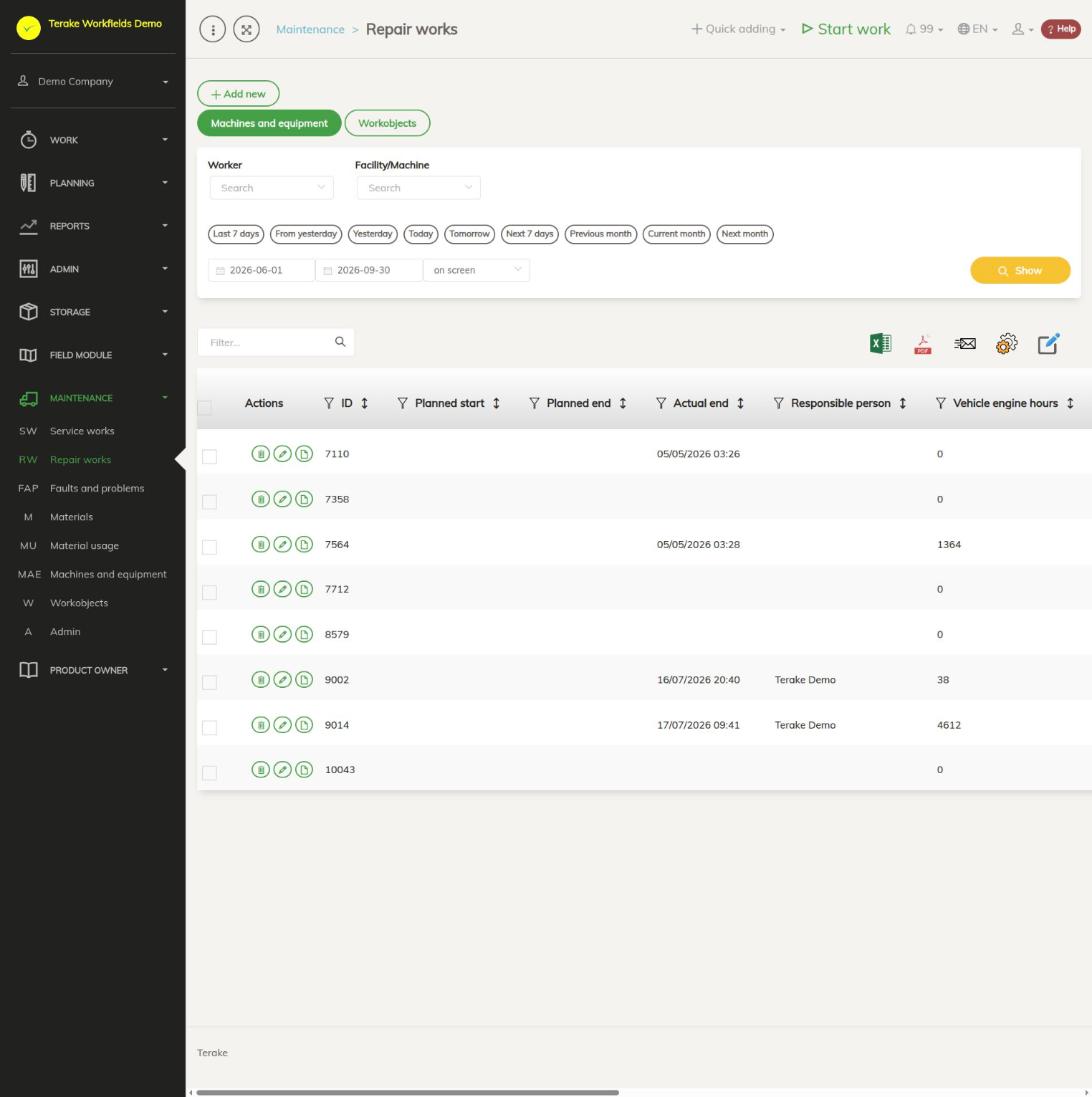
Page layout
- The buttons “Machines and equipment” and “Workobjects” choose whether the list shows repairs of machines or of work objects.
- Filters “Worker” and “Facility/Machine” (the work object for work objects) and the period by “Planned start”; press “Show”.
- The “Actions” column has a bin (delete, only for the role “Administrator”), a pencil (change the repair) and a document icon (the view of the repair’s tasks).
- Other columns: “ID”, “Additional”, “Planned start”, “Planned end”, “Actual end”, “Responsible person”, “Faulty item”, “Vehicle engine hours”, “Kilometers”, the number of tasks (“Total points”, “Correct”, “Not correct”, “Unhandled”) and “Repair status”.
“Repair status” is one of the following:
- “Registered”: the repair has no tasks or assignments yet;
- “Planned”: the repair has tasks none of which is marked yet, or an assignment that was created automatically;
- “In progress”: some tasks are marked, or an assignment for the repair has been planned for an employee;
- “Closed”: all tasks are marked or the repair’s assignment is done.
How a repair is created
- In the fault window with the button “Repair planning” (see Faults and problems). The repair is linked to the fault, the fault’s description and pictures are copied to it, and the repair window shows the “Fault” with the fault’s number.
- When approving a maintenance, with the button “Plan repair of items not in order”: the maintenance tasks marked “Not OK” are copied to the repair together with their materials and files.
- On this page with the button “Add new”.
How to add and change a repair
- Press “Add new” or the row’s pencil.
- Select the “Class” (“Facility/Machine” or “Workobject”) and the “Maintained item”. They cannot be changed after saving.
- For a machine, enter the “Vehicle engine hours” and “Kilometers” if needed.
- Select the “Responsible person”, “Planned start” and “Planned end”, and describe the work in the field “Additional”.
- Press “Save”. After that you can add assignments, tasks and files.
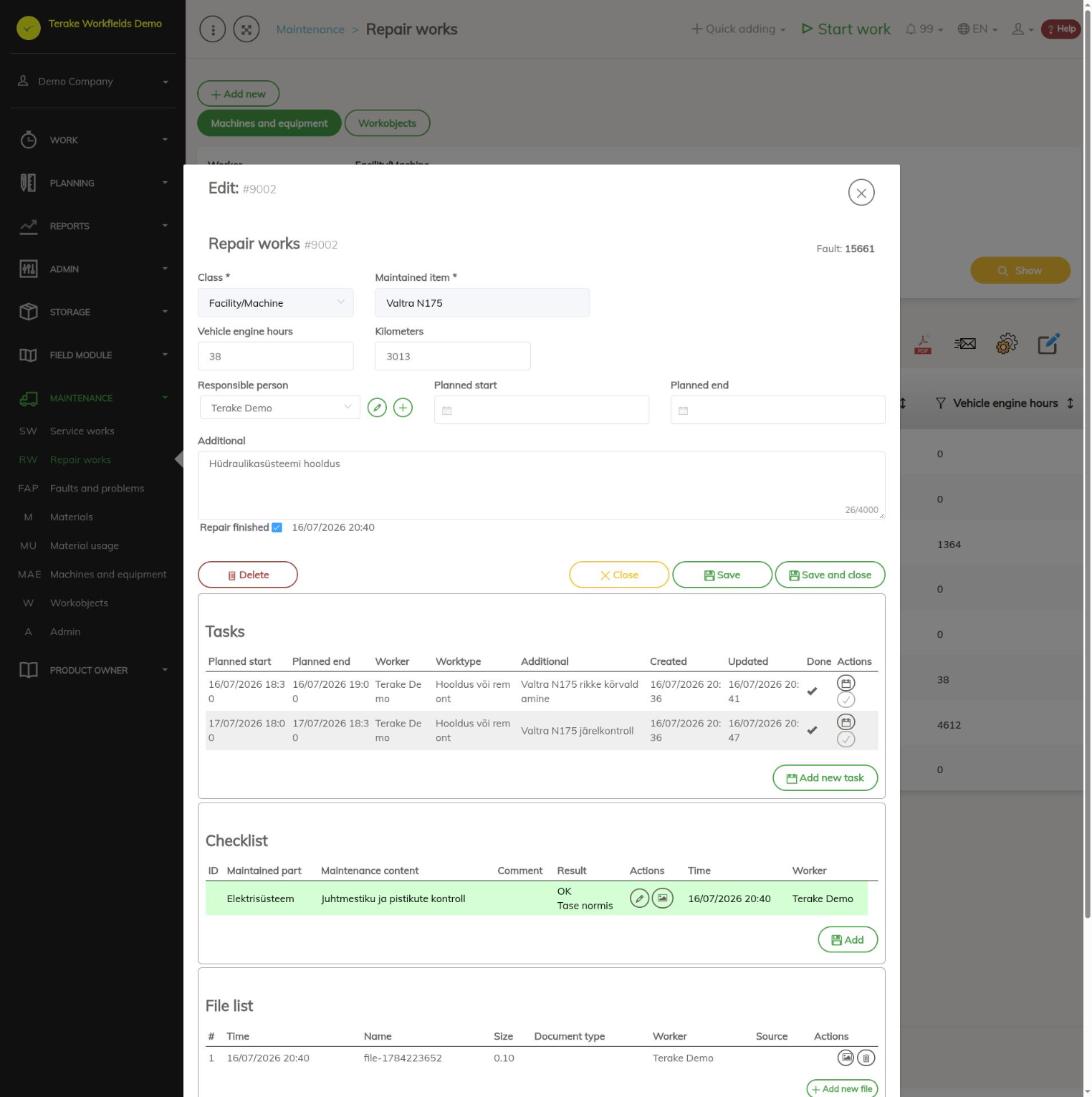
The repair window has these blocks:
- “Tasks”: the work assignments linked to the repair. On saving, an assignment is created for the person responsible for the maintained item’s maintenance. The button “Add new task” opens the calendar view Tasks; an assignment can be marked done with the button “Mark as done”.
- “Checklist”: the work done during the repair. Add a new task with the button “Add”; mark each task “OK” or “Not OK” and add the material used with the button “Add material”.
- “File list” and “Material usage”: the files added and the materials added to the tasks with amount and price.
How to finish a repair
When the repair’s last task is marked, the repair is marked done automatically and the list shows the “Actual end”. If all tasks are “OK”, the field “Actual resolving time” of the linked fault is filled in at the same time. To finish a repair without tasks, tick “Repair finished” in the repair window and save. A fault can always also be closed in the fault window in the block “Fault closing” by filling in “Actual resolving time” and “Repairer notes”.
Who can see and change it
- The “Maintenance” menu is shown to employees with the role “Vehicle service”.
- Only the role “Administrator” can delete a repair from the list.
Tips
- All faults of one machine are on the “Faults and problems” tab of the machine window (see Machines and equipment).
- Regular maintenance is on the page Service works.
API calls on this page
For integrations and AI assistants: this page uses the following Terake API calls. The full description is in the API reference.
When the page opens:
PUT /api/appsettings/{key}– Saves one application setting by keyGET /api/repairs/facility– Repair case collection of facilities
Adding, changing and deleting (from the API description):
DELETE /api/repairs/facility/{id}– Delete InspectionCase by ID or UUID
Other calls from this screen’s dialogs and actions (from the web client’s code):
DELETE /api/inspection-cases/{inspection_case_id}/item/{item_id}/material_usage/{material_usage_id}– Delete InspectionCase Item Material UsageDELETE /api/inspection_case_items/{inspection_case_item_id}– Deletes an unhandled InspectionCase itemDELETE /api/inspection-cases/facility/{id}– Delete InspectionCase by ID or UUIDDELETE /api/inspection-cases/workobject/{id}– Delete InspectionCase by ID or UUIDDELETE /api/repair-cases/{id}– Delete InspectionCase by ID or UUIDDELETE /api/repair-cases/facility/{id}– Delete InspectionCase by ID or UUIDDELETE /api/repairs/workobject/{id}– Delete InspectionCase by ID or UUIDGET /api/inspection-cases/{inspection_case_id}/item/{item_id}– Get InspectionCaseItemGET /api/inspection_case_items/{id}/files– List all files related with parent objectGET /api/inspection-cases/facility/{id}– InspectionCase by ID or UUIDGET /api/inspection-cases/workobject/{id}– InspectionCase by ID or UUIDGET /api/repair-cases/facility/{id}– InspectionCase by ID or UUIDGET /api/repair-cases/{id}– InspectionCase by ID or UUIDGET /api/repairs/facility/{consumer_id}– Repair case collection of one facilityGET /api/repairs– Repair case collectionGET /api/repairs/workobject/{consumer_id}– Repair case collection of one work objectGET /api/repairs/workobject– Repair case collectionPOST /api/repair-cases/facility– Create new InspectionCasePOST /api/repair-cases– Create new InspectionCasePUT /api/inspection-cases/{inspection_case_id}/item/{item_id}/material_usage/{material_usage_id}– Creates or modifies the material usage of an InspectionCase itemPUT /api/inspection-cases/{inspection_case_id}/item/{item_id}– Modifies an InspectionCase itemPUT /api/inspection-cases/facility/{id}– Modifies InspectionCasePUT /api/inspection-cases/workobject/{id}– Modifies InspectionCasePUT /api/repair-cases/facility/{id}– Modifies InspectionCasePUT /api/repair-cases/{id}– Modifies InspectionCase