“Admin Settings” brings together the company’s master data: the options used in Terake when registering work, planning and in reports, such as materials, machines and equipment, worktypes, customers, workobjects, cost centers, professions and regions. The administrator uses the page to set up the company and keep these options in order. This guide also describes how all the list pages work; the guide of each list describes only its own fields and rules.
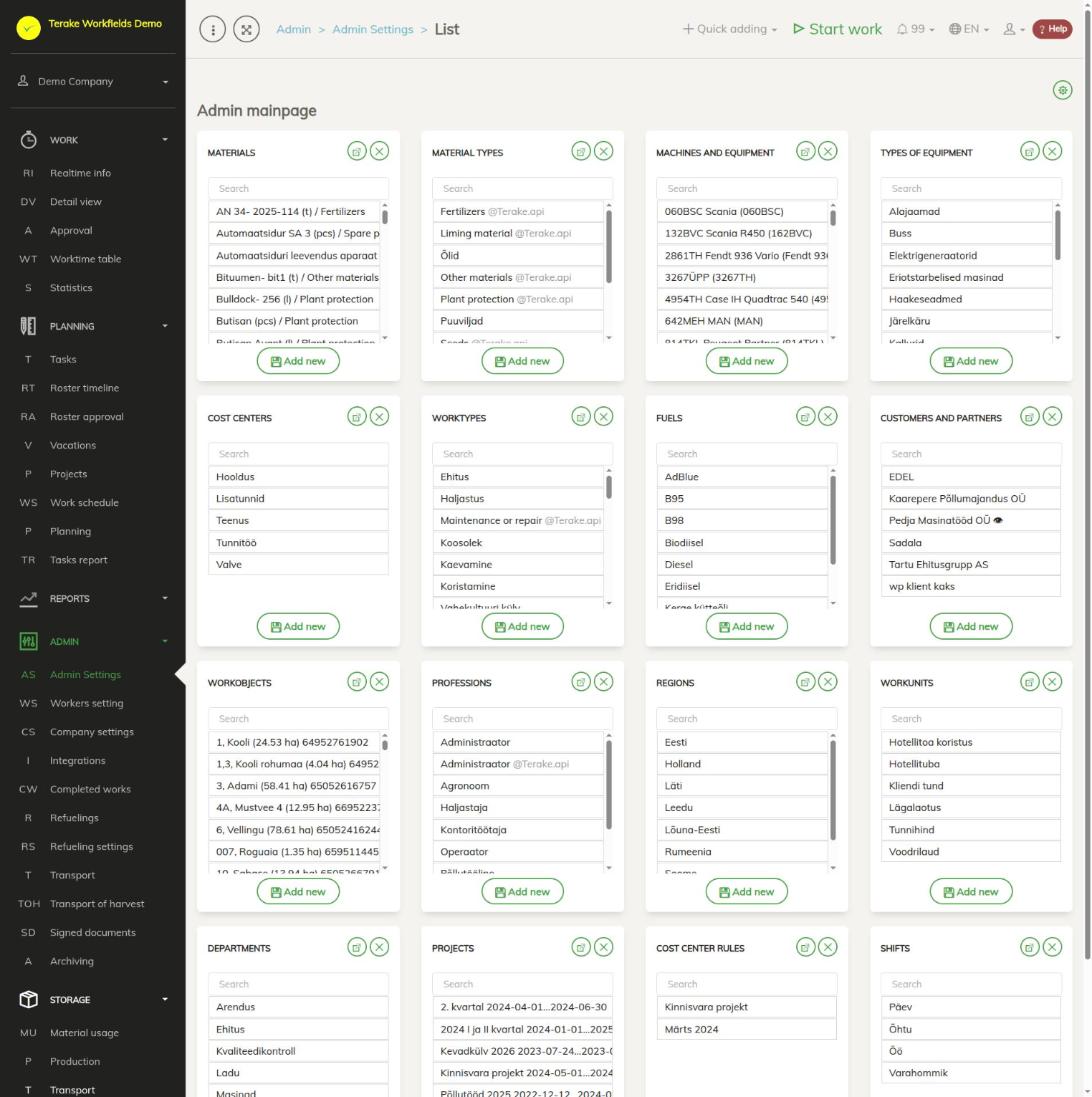
Page layout
Each kind of master data has its own card on the page. A card has:
- a title (e.g. “Materials”, “Worktypes”, “Customers and partners”); click the title or the “Show as table” button to open the list page of that kind;
- a “Hide” button that removes the card from the page (asks for confirmation: “Are you sure?”);
- a “Search” field and a short list of records. If there are many records, only some are shown, with the message “Only some shown. Use search.” at the bottom;
- an “Add new” button that opens the form for a new record.
A grey @company name after a record means that the record belongs to another company, for example a common Terake option or a record shared by a partner. You can use it but not change it.
The “View settings” button at the top right opens the “Displayable data fields” window: tick the cards you want to see on the page and press “Save and close”. This is also how you bring back a hidden card. The “Crops” card is only shown to agricultural companies.
How to add or change a record on the Admin Settings page
- Find the record on its card; if needed, type part of the name in the “Search” field.
- Click the record. The edit window opens. For a new record, press “Add new” on the card.
- Fill in the fields. Fields marked with an asterisk (*) are mandatory.
- Press “Save” (the window stays open) or “Save and close”.
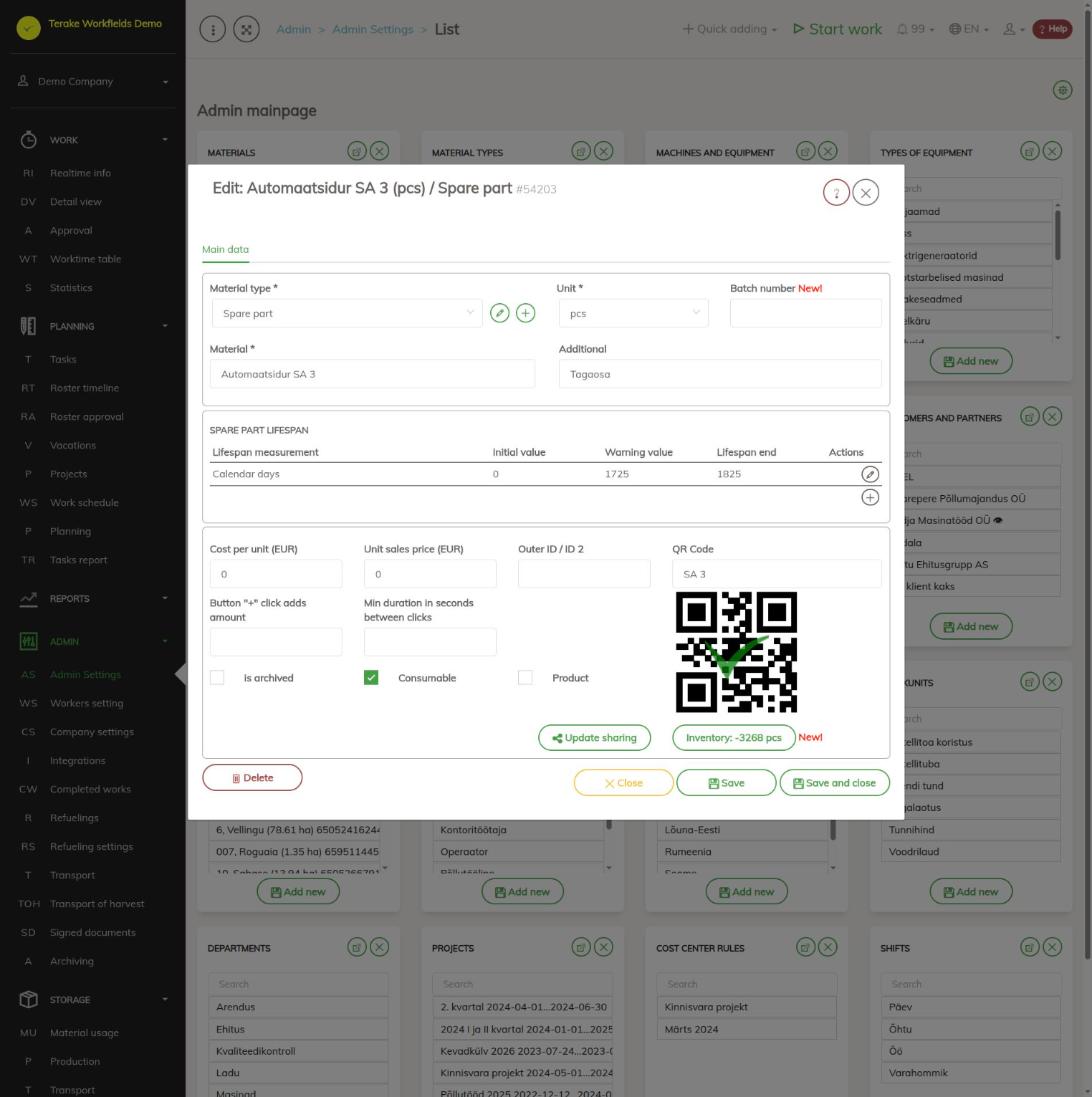
The “Help” button in the header of the edit window opens the guide for that kind of record. Clicking a project opens the “Projects” page instead of a window.
How the list pages work
All list pages opened from the Admin Settings page (e.g. “Materials”, “Machines and equipment”, “Worktypes”) have the same layout.
Buttons and lists
- Add new … (e.g. “Add new material”) opens the form for a new record.
- “Add from file” loads records from an Excel file (see below). The button is on the pages where loading from a file is possible.
- In the “Active list” drop-down you can select “Archived list”. The archived list contains archived records and also records deleted in the last 30 days. The drop-down is only on pages where records can be archived.
Table tools
- The “Filter…” field searches all columns of the table.
- Use the icon in a column header to filter the column’s values and the arrow to sort. When a filter is on, a yellow “Filters active” row is shown.
- Icons above the table: “open in Excel”, “open as PDF file”, “Send to email” and “set view” (choose the columns to show; the red number shows how many columns are hidden). Machines, materials, worktypes, shifts and projects also have “Generate PDF with QR codes”.
- “Bulk edit parameters” (pencil icon) changes all ticked rows of the table at once. The “Record count” in the window shows how many rows are selected; tick the fields you want to change and enter the new value. You can also use it to archive (“Archived”) or delete (“Deleted”) several records at once.
Changing, archiving and deleting a record
- To change your own company’s record, click its row in the table. The same window as on the Admin Settings page opens, with the “Delete”, “Close”, “Save” and “Save and close” buttons at the bottom. Some pages also have “Edit” and “Delete” buttons at the start of the row.
- Archiving hides the record from the options and from the active list, but it stays with earlier work and in reports. Archive your own record by ticking “Archived” on the form (where it exists) or with “Bulk edit parameters”.
- You cannot change another company’s record (e.g. a common Terake option), but you can archive it for your own company: press the “Archive” button at the start of the row, or click the row and confirm “Perform archiving?”. The record stays available to other companies. Clicking the same row in the archived list asks “Restore from archive?”.
- Deleting removes the record from the lists and options. A deleted record stays in the archived list for 30 days; to restore it, tick the row and clear “Deleted” and “Archived” in “Bulk edit parameters”. If the record has already been used in work, it is usually better to archive it.
- “Update sharing” on the form opens the “Share with partners” window: tick the partners you share the record with and press “Update sharing”. Partners are added on the Customers and partners page.
Buttons next to selection fields
On many forms, a selection field (e.g. “Material type”, “Region”, “Customer”) has a pencil button and a plus button next to it. The pencil changes the selected record, the plus adds a new record straight from the form, without going to the Admin Settings page.
How to load records from a file
- Open the list page and press “Add from file”.
- Press “Select file” and choose an Excel file. The first sheet of the file is always read.
- If the first row of the file is a header row, leave “File has header row” ticked.
- In each column of the “Select fields:” row, choose which field the column contains. Terake suggests a matching field based on the headers. Until all mandatory fields are selected, the page shows “Mandatory fields” with the missing fields; when all are selected, the message is “All mandatory fields are selected”.
- Check the cell background colours (see below) and press “Save”. The “Progress” window shows how loading is going, and the “Import result” column shows the result of each row.
- To return to the list, press “Active list”.
Before loading, the data is checked and problem cells are coloured (hover over a cell to see an explanation):
- red: a mandatory value is missing;
- yellow: this option (e.g. material type, facility type, customer) does not exist yet; a new one is created when loading;
- blue: this option does not exist and a new one cannot be created, so a default value is used (e.g. for a unit or a workobject type);
- orange: the value is in the wrong format, for example text instead of a date or a number.
Who can see and change it
“Admin Settings” and its list pages are in the Admin menu and open only for the “Administrator” role. Other users can also add and change records with the buttons next to selection fields on other pages, if “Users have by default create privilege” is ticked in the company settings or if their role allows it (some special roles, e.g. “Agronomist”, “Vehicle service” or “Personnel”, for the records of their own area). This does not apply to the “Observer” and “ARIB employee” roles without a separate right.
Tips
- Before you start registering work, think through which work, machines, objects and cost centers you want to measure, and enter them. The more accurate the master data, the more Terake can do automatically (e.g. Cost center rules).
- The “Outer ID / ID 2” field is meant for a code in accounting or another system, used when exporting data.
- If you have questions, write to info@terake.com.
Video guides
Setting up your company in Terake
API calls on this page
For integrations and AI assistants: this page uses the following Terake API calls. The full description is in the API reference.
When the page opens:
GET /api/search/{classificator_type}– Objects of one classificator type for filling drop-down lists
Other calls from this screen’s dialogs and actions (from the web client’s code):
DELETE /api/agreements/{id}– Delete Agreement by ID or UUIDDELETE /api/calendarevents/{id}– Deletes a calendar eventDELETE /api/customer/{customer_id}/person/{id}– Deletes a Customer contact personDELETE /api/inspections/workobject/{id}– Delete InspectionCase by ID or UUIDDELETE /api/project-resource/{resource_type}/{project_id}/{resource_id}– Removes a resource from a Project, together with its QR image and preferencesDELETE /api/workobjects/cadastres/{workobject_id}/{cadastre_id}– Removes a Workobject from a CadastreDELETE /api/workobjects/{id}– Delete WorkobjectDELETE /api/workobjects/{id}/files/{uuid}– Delete fileGET /api/agrifield/pria/massive/{massiveid}– Returns Pria MassiveGET /api/cadastres/{id}– Get CadastreGET /api/costaccountrules/{id}– CostAccountRule by ID or UUIDGET /api/costaccounts/{id}– CostAccount by ID or UUIDGET /api/crops/{id}GET /api/departments/{id}– Department by ID or UUIDGET /api/documenttypes/{id}GET /api/facilities/enginehours-log/{id}– Facility engine hours and kilometers history from manual entryGET /api/facilities/{id}/files– List all files related with parent objectGET /api/facilities/telemetry-log/{id}– Facility engine hours and kilometers history from telemetry data logGET /api/facilities/{parent_id}/part/{id}/measure_history– Facility Part check historyGET /api/facilities/{parent_id}/part– Facility Parts collectionGET /api/facilities/{parent_id}/part-with-history– Facility Parts collection with measurement historyGET /api/facilitytypes/{id}GET /api/faults/facility/{faultitem_consumer_id}– Faultitem collection of one facilityGET /api/faults/workobject/{faultitem_consumer_id}– Faultitem collection of one work objectGET /api/faults/workobject– Faultitem collection of work objectsGET /api/fieldbook– Fieldbook Agrifield collectionGET /api/fuelfillings/{id}– FuelFilling by ID or UUIDGET /api/fuelfillings/facility/{facility_id}– Fuel fillings recorded against one facility.GET /api/fuels/{id}GET /api/geoinfo/cadaster/{num}– Cadastral register information for one cadastre numberGET /api/geometry/agrifielddata/{id}– Geometry of one agrifield_data record.GET /api/inspections/facility/{consumer_id}– InspectionCase collection of one facilityGET /api/inspections– InspectionCase collectionGET /api/inspections/workobject/{consumer_id}– InspectionCase collection of one work objectGET /api/inspections/workobject– InspectionCase collectionGET /api/inventorylog/{id}– Get Facility Inventory LogGET /api/locationareas/{id}GET /api/material-categories/{id}– Get MaterialCategoryGET /api/materials/{id}– Get MaterialGET /api/materials/{id}/harvest_sources– Harvest Material sourcesGET /api/materials/{id}/material_composition– Harvest Material compositionGET /api/materials/{material_id}/inventory– MaterialInventory of a materialGET /api/office-hours– Office hours in periodGET /api/fieldbook/overlapping-check/{agrifield_id}/{crop_period_id}– Reports fieldbook entries whose geometry overlaps for one Agrifield and crop periodGET /api/pre-usage-check/facility/{consumer_id}– Pre-usage checks of one facilityGET /api/professions/{id}GET /api/project-resource/{resource_type}/{project_id}– Project related Resources collectionGET /api/project-resource/{resource_type}/{project_id}/{resource_id}– Project statistics row for one resourceGET /api/projects/{id}– Project by IDGET /api/relations/{object_type}/{object_id}– Returns the objects related to one Terake objectGET /api/appsettings/visiblefields/{tablename}– Visible columns of an admin UI tableGET /api/shifts/{id}– Get ShiftGET /api/workobjectcategories/{id}GET /api/workobjects– All Workobjects listGET /api/worktypes/{id}– Get WorktypeGET /api/workunits/{id}– Get MaterialGET /api/integration-partner-data/{terake_object_code}/{object_id}– Integration partner id's related to objectPOST /api/agreements– Create new AgreementPOST /api/calendarevents/{id}– Creates or modifies a calendar event attached to a parent objectPOST /api/customer/{customer_id}/person/{id}– Creates or modifies a Customer contact personPOST /api/sendinvitationletter– Sends a partnership invitation to a customer's e-mail addressPOST /api/facilities/integration– Registers a Facility reported by the integration serverPOST /api/facilities/log-mapping-event– Records a facility-mapping event sent by the integration serverPOST /api/inventory_facility/{facility_id}/{event_name}– Change Inventory status by registering eventPOST /api/project-resource/{resource_type}/{project_id}– Creates or modifies a Project resourcePOST /api/workobjects/cadastres/{workobject_id}/{cadastre_id}– Add Cadastre to WorkobjectPOST /api/workobjects– Creates or modifies a WorkobjectPUT /api/agrifields/{id}/setcropperiod– Sets the Agrifield data for a crop periodPUT /api/facilities/{parent_id}/check/{id}– Measure Facility PartPUT /api/geometry/agrifielddata/{id}– Stores the geometry of an Agrifield data recordPUT /api/project-resource/{resource_type}/{project_id}/{resource_id}– Modifies a Project resourcePUT /api/appsettings/visiblefields/{tablename}– Saves which columns are visible for a table in the admin UIPUT /api/workobjects/{id}– Modifies a Workobject