In this view a maintenance or repair is carried out following the checklist: each task is marked as OK or faulty, the materials used and files are added, and finally the maintenance is finished and approved. The view opens on the page Service works or Repair works with the button “Do service” or the row’s document icon. The view is used by mechanics and the people responsible for maintenance.
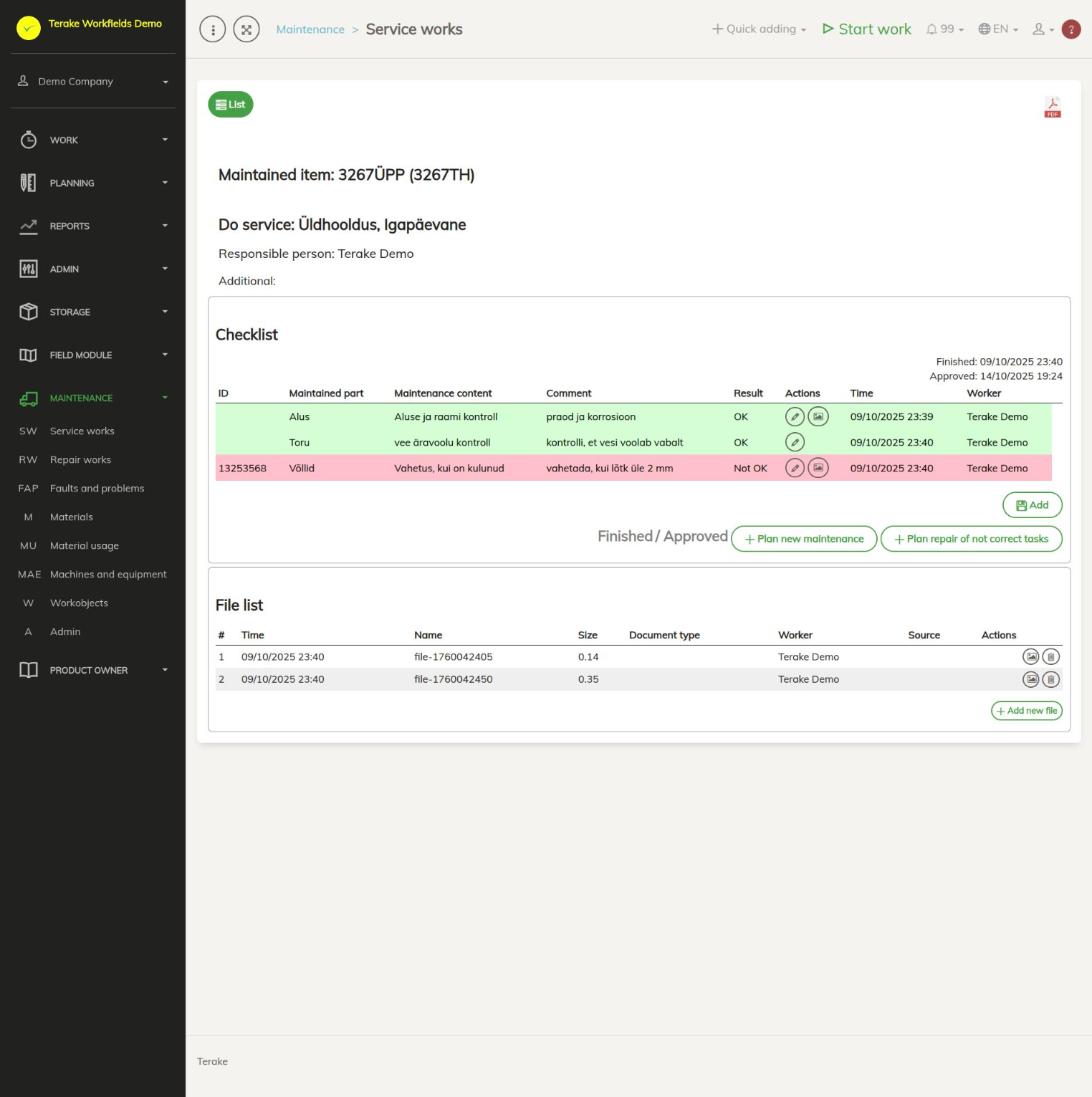
Page layout
- At the top: the button “List” takes you back to the list of service or repair works, the PDF icon makes a maintenance report as a PDF file.
- Header: “Maintained item”, for a maintenance “Do service” with the maintenance schedule and service interval, “Vehicle engine hours” and “Kilometers” (if planned), “Responsible person” and “Additional”. If the maintenance is linked to a completed work, the “Work record ID” is on the right.
- “Checklist”: a table with the columns “ID”, “Maintained part”, “Maintenance content”, “Comment”, “Result”, “Actions”, “Time” and “Worker”. The row of a task that is OK is green, of a faulty one red, of an unmarked one without colour. Above the table are the time of finishing (“Finished”) and of approval (“Approved”).
- Below the tasks: the button “Add” (a new task) and, depending on the state of the maintenance, the buttons “Mark inspection finished”, “Approve inspection”, “Approve and plan next”, “Plan new maintenance” and “Plan repair of items not in order”.
- “File list”: files and pictures added to the maintenance; the button “Add new file” adds a new one.
How to mark a task
- Below an unmarked task is the field “Additional”. Write a note there if needed, for example the measured wear or a fault found.
- If the task checks a machine part, enter the “Current value” at the part (for example the brake disc thickness).
- If the task replaces a machine part, the part’s material and amount and the block “Lifespan measurements” are below the task. Check the new part’s “Initial value”, “Warning value” and “Lifespan end”.
- Press “OK” or “Not OK”. The task keeps the time it was marked and your name.
You can change the result of a marked task with the pencil in the “Actions” column. The picture icon shows the files and pictures added to the task. The bin icon of an unmarked task deletes the task from this maintenance.
How to add material
- Press “Add material” below the task.
- Select the “Spare part” and enter the “Amount” (both required).
- Press “Save and close”.
Change or delete added material with the pencil on its row. The material usage of all maintenance is in the report Material usage.
How to add a task
- Press “Add” below the table of tasks.
- Enter “Maintained part” and “Maintenance content” (required) and, if needed, a “Comment”, or select a task from the tasks of the maintained item’s maintenance schedule.
- Press “Save and close”. The new task is added at the end of the table and you can mark it like the others.
How to finish and approve a maintenance
- When the last task is marked, the maintenance is marked done automatically. With the button “Mark inspection finished” you finish the maintenance even if some task was left unmarked.
- Press “Approve inspection” or “Approve and plan next”. The latter immediately opens a new maintenance for the same item, with the maintained item, schedule and responsible person filled in. For an approved maintenance the button “Plan new maintenance” opens the same form.
- If some task was left “Not OK”, press “Plan repair of items not in order”, select the “Planned start” (required) and, if needed, the “Planned end”, and press “Save and close”. A repair work is created with the faulty tasks together with their materials and files.
If the maintenance was done to repair a fault, the fault is marked resolved when the maintenance is finished.
Who can see and change it
- The view opens from the service and repair works pages, which are in the “Maintenance” menu for the role “Vehicle service”.
- The roles “Administrator”, “Dispatcher” and “Vehicle service” can add and change maintenance, as can the maintenance’s responsible person and approver.
- The buttons “Approve inspection” and “Approve and plan next” are available to the roles “Administrator” and “Foreman”.
Tips
- Mark the tasks as you do the work: then each task has the right time and the right person.
- After doing the maintenance, replace the planned engine hours and kilometres with the actual reading in the maintenance edit window on the page Service works.
- Maintenance schedules and tasks are described on the page Maintenance ADMIN.
API calls on this page
For integrations and AI assistants: this page uses the following Terake API calls. The full description is in the API reference.
When the page opens:
GET /api/inspection-cases/{id}– InspectionCase by ID or UUIDGET /api/inspection_case/{id}/files– List all files related with parent object
Adding, changing and deleting (from the API description):
DELETE /api/inspection_case/{id}/files/{uuid}– Delete fileDELETE /api/inspection-cases/{id}– Delete InspectionCase by ID or UUIDPOST /api/inspection_case/{id}/files– Add new file to parent objectPOST /api/inspection-cases– Create new InspectionCasePOST /api/inspection-cases/{inspection_case_id}/inspection-task– Adds a task to an InspectionCase (without InspectionTemplate)PUT /api/inspection-cases/{id}/plan-follow-up– Plan follow-up Repair case for not done tasks in InspectionCasePUT /api/inspection-cases/{id}– Modifies InspectionCasePUT /api/inspection-cases/{id}/set-approved– Set InspectionCase approvedPUT /api/inspection-cases/{id}/set-input-finished– Marks the inspection case input as finished
Other calls from this screen’s dialogs and actions (from the web client’s code):
DELETE /api/inspection-cases/{inspection_case_id}/item/{item_id}/material_usage/{material_usage_id}– Delete InspectionCase Item Material UsageDELETE /api/inspection_case_items/{inspection_case_item_id}– Deletes an unhandled InspectionCase itemDELETE /api/inspection-cases/facility/{id}– Delete InspectionCase by ID or UUIDDELETE /api/inspection-cases/workobject/{id}– Delete InspectionCase by ID or UUIDGET /api/inspection-cases/{inspection_case_id}/item/{item_id}– Get InspectionCaseItemGET /api/inspection_case_items/{id}/files– List all files related with parent objectGET /api/inspection-cases/facility/{id}– InspectionCase by ID or UUIDGET /api/inspection-cases/workobject/{id}– InspectionCase by ID or UUIDGET /api/inspection_task/{id}– Returns one InspectionTask by id or uuidPOST /api/generate_inspection_pdf– Renders an inspection case as a PDFPOST /api/inspection-cases/facility– Create new InspectionCasePOST /api/inspection-cases/workobject– Create new InspectionCasePUT /api/inspection-cases/{inspection_case_id}/item/{item_id}/material_usage/{material_usage_id}– Creates or modifies the material usage of an InspectionCase itemPUT /api/inspection-cases/{inspection_case_id}/item/{item_id}– Modifies an InspectionCase itemPUT /api/inspection-cases/facility/{id}– Modifies InspectionCasePUT /api/inspection-cases/workobject/{id}– Modifies InspectionCase