On the “Customers and partners” page you manage the customers you do work for and the partners you share Terake data with. A customer can be selected for work, plans, workobjects and machines. The page is used by the administrator. The list, loading from a file, archiving and “Bulk edit parameters” are described in general on the Admin Settings page.
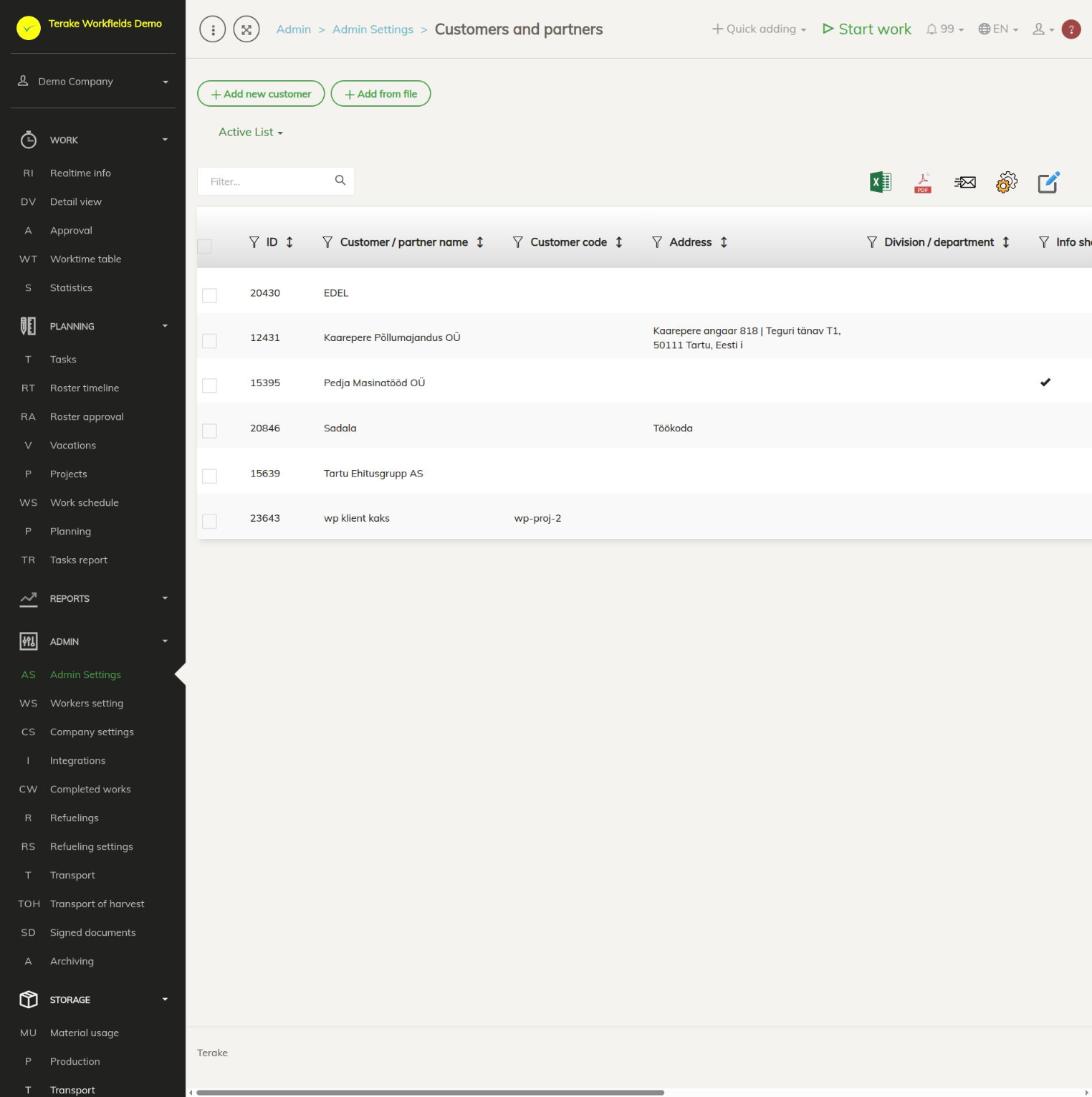
Page layout
- The “Add new customer” and “Add from file” buttons and the “Active list” / “Archived list” drop-down.
- Table columns: “Customer / partner name”, “Customer code”, “Address”, “Division / department”, “Info sharing”, “Info sharing starts”, “Info sharing ends”, “Invitation sent”, “Invitation responded”, “Registry code” and the contact person’s details.
- Each row starts with the “Edit” and “Delete” buttons.
How to add a customer
- Press “Add new customer”.
- Enter the “Customer / partner name”. If needed, fill in the “Customer code” (e.g. the accounting code) and “Registry code”, and select “Departments”.
- In the “Address” field, select the customer’s workobject. If it does not exist yet, add it with the plus button next to the field.
- Press “Save”. After saving you can add contact persons and sharing.
- In the “Contact persons” block, press “Add new” and enter the “Name”, “Email”, “Phone” and “Additional”. Change or delete an existing contact person with the buttons on its row.
- Press “Save and close”.
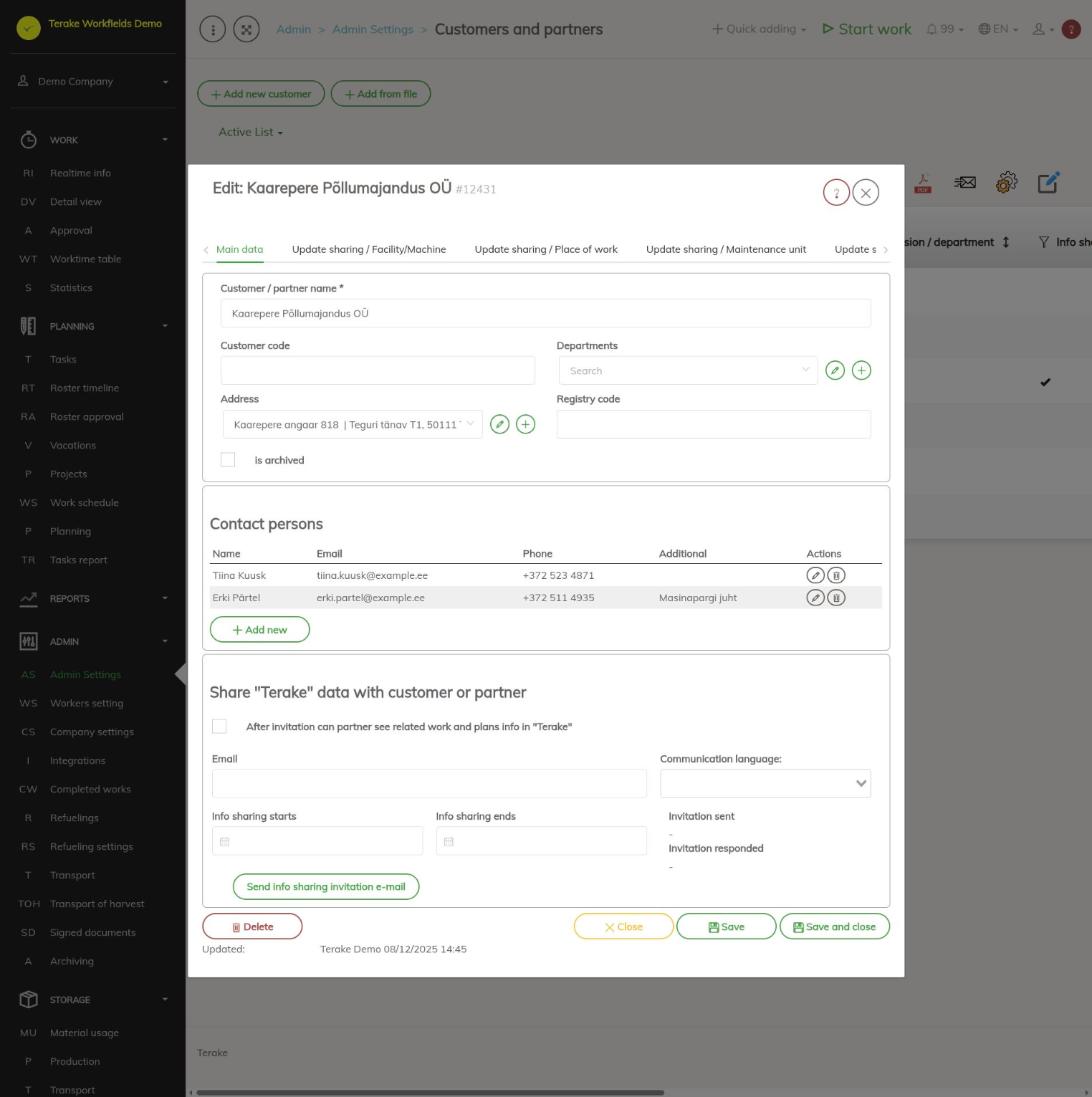
How to share data with a customer or partner
If the customer or partner also uses Terake, you can share information about work and plans with each other.
- Open the customer and, in the “Share “Terake” data with customer or partner” block, tick “After the invitation is sent, the partner can see the related work and plans in “Terake””.
- Enter the “Email” the invitation is sent to and select the “Communication language”.
- If needed, set “Info sharing starts” and “Info sharing ends”.
- Save and press “Send info sharing invitation e-mail”. The button text changes to “Sharing invitation is sent”.
- The “Invitation sent” and “Invitation responded” fields show when the invitation was sent and answered.
Once the partner has accepted the invitation, you can choose what you share with them on the “Update sharing / Facility/Machine”, “Update sharing / Place of work”, “Update sharing / Maintenance unit” and “Update sharing / Material” tabs:
- in the “Shared to partner” column, tick your machines, implements, workobjects or materials (“Check all” ticks all of them) and press “Update sharing”;
- the “Shared by partner” column shows what the partner has shared with you.
The “Log” tab shows the history of changes to the customer’s data.
Who can see and change it
The page opens for the “Administrator” role.
Tips
- When loading from a file, the “Customer / partner name” is mandatory; you can also load “Customer code”, “Address”, “Workobject name”, “Contact person”, “Phone” and “Email”.
- You can link a customer’s machines and workobjects to the customer on the machine or workobject form (the “Customers and partners” or “Customer” field), see Machines and equipment and Workobjects.
- Archive a customer you have done work for instead of deleting it: tick “Archived” on the form.
API calls on this page
For integrations and AI assistants: this page uses the following Terake API calls. The full description is in the API reference.
When the page opens:
GET /api/customers– Customer collection
Adding, changing and deleting (from the API description):
DELETE /api/customers/{id}– Delete Customer by ID or UUIDPOST /api/customers– Create new CustomerPUT /api/customers/{id}– Modify Customer
Other calls from this screen’s dialogs and actions (from the web client’s code):
DELETE /api/customer/{customer_id}/person/{id}– Deletes a Customer contact personGET /api/customers/{id}– Customer by ID or UUIDPOST /api/customer/{customer_id}/person/{id}– Creates or modifies a Customer contact personPOST /api/sendinvitationletter– Sends a partnership invitation to a customer's e-mail addressPUT /api/customers/{customer_id}/share/{object_type}– Sets which objects of one type are shared with a CustomerPUT /api/customers/share_object/{object_type}/{object_id}– Shares one object of the given type with customers