“Projects” on the Admin Settings page is the list of projects for the administrator. A project is a one-off undertaking limited in time and resources; workers select it when registering work and managers when planning. Here the administrator adds projects, links them to a customer, division and cost center, assigns the project manager and archives finished projects. The same page is in the Planning menu, where project managers plan the project’s resources and follow how the plan is carried out: see Planning: Projects. The list, loading from a file and “Bulk edit parameters” are described in general on the Admin Settings page.
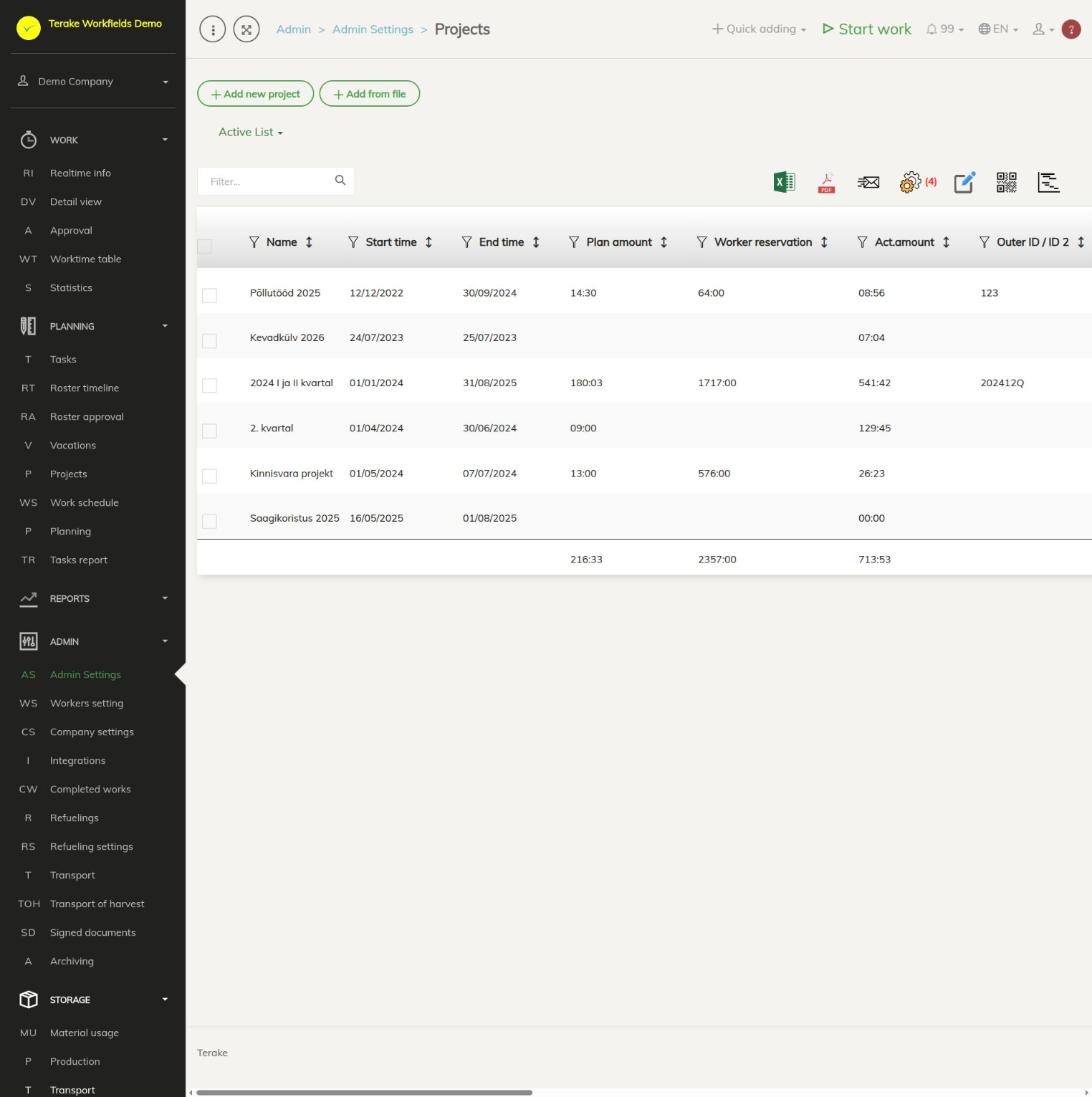
Page layout
- The “Add new project” and “Add from file” buttons and the “Active list” / “Archived list” drop-down.
- The table has the project name, “Start time”, “End time”, planned and actual hours and costs, “Outer ID / ID 2” and more. The hours and amounts columns have a total at the bottom. You can choose the columns shown with the “set view” icon.
- The chart icon at the end of the row opens the project’s graphical overview; the pencil opens the project.
- Above the table, besides the usual icons, there are “Generate PDF with QR codes” and “View project graph” (the selected projects on a timeline).
- The project opens on the same page instead of the list. Return to the list from the “Back to list” drop-down or with the “Close” button.
How to add a project
- Press “Add new project”.
- Enter the “Name” (mandatory), “Start time” and “End time” (both mandatory; the end must be later than the start).
- If needed, enter the “Outer ID / ID 2” (e.g. the project code in accounting).
- Select “Customers and partners”, “Departments” (you can select several), “Project manager” and “Cost center”.
- Enter the “Planned workhours” and “Planned budget” if you want to compare the plan with the actual figures.
- If needed, write “Additional” (up to 1000 characters) and a “QR Code”.
- Press “Save” (the form stays open) or “Save and close”.
How to change a project
- Click the project row or press the pencil button. The project opens as a view with the fields locked.
- Press “Edit”, make the changes and press “Save” or “Save and close”.
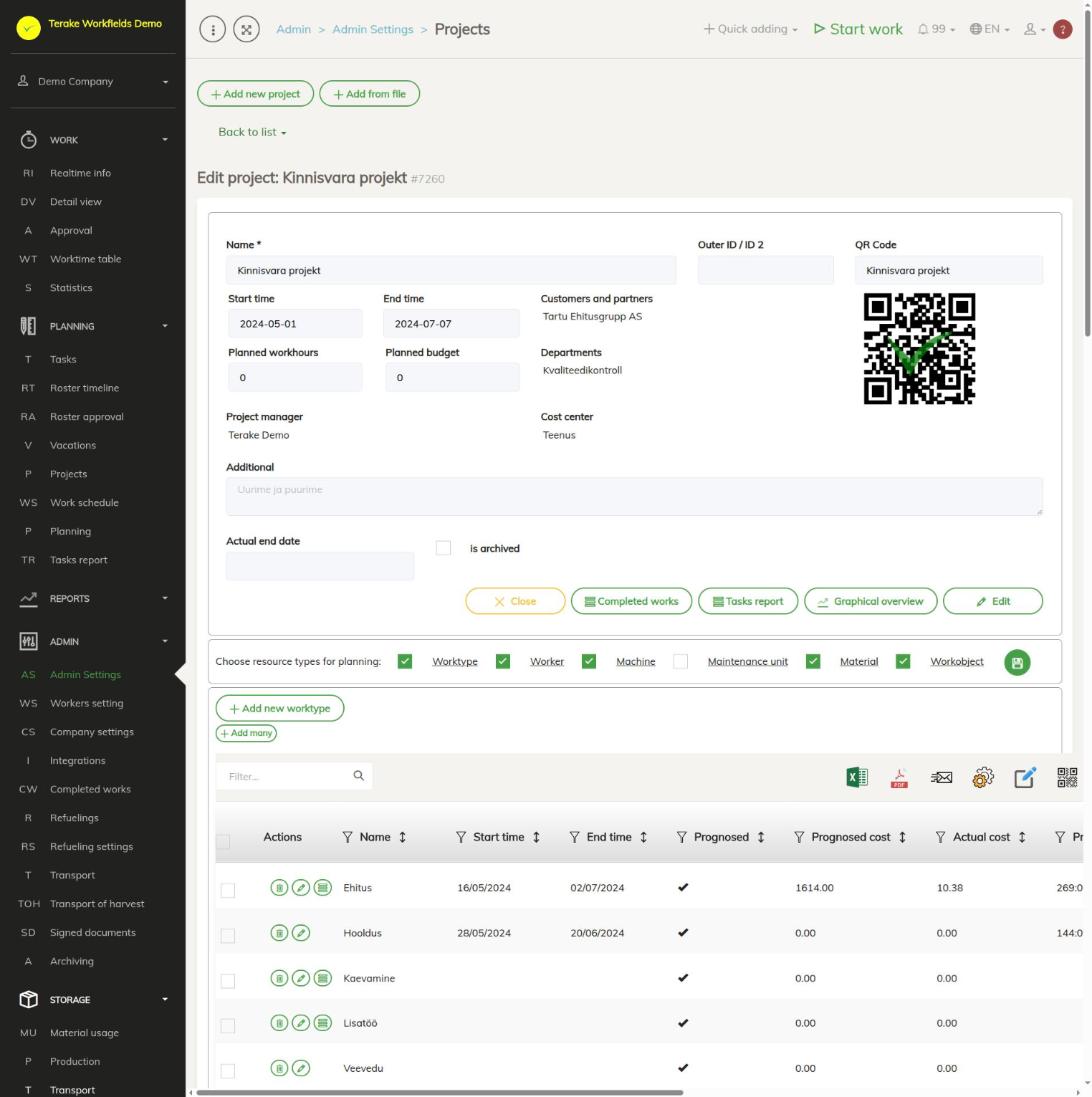
Below the view are the “Completed works” (the project’s work in the detail view), “Tasks report” (the project’s tasks) and “Graphical overview” buttons, and below them the “Choose resource types for planning” block for planning resources. Resource planning is described on the Planning: Projects page.
Project fields
- Name, Start time, End time: the project name and planned period.
- Outer ID / ID 2: a code in another system, used when exporting data.
- Customers and partners: the customer the project is done for.
- Departments: the divisions the project belongs to.
- Project manager: the worker responsible for the project. If the selected worker is a worker of your company and does not yet have the “Project Manager” role, the role is given to them automatically when saving.
- Cost center: when saving, the project’s cost center rule is created or updated; it gives this project’s work the selected cost center. When the cost center is removed, the rule is deleted too. See Cost center rules.
- Planned workhours, Planned budget: the project’s total volume, which the actual hours and costs are compared with.
- QR Code: makes it easier to select the project in the mobile app. A saved project has the “Fill QR Code” button; the QR image appears after saving.
- Additional: free text.
- Actual end date: when the project actually ended.
- is archived: the project is no longer in the options but stays with work and in reports.
How to archive a finished project
- Open the project and press “Edit”.
- Enter the “Actual end date” and tick “Archived”.
- Press “Save and close”.
To archive several projects at once, tick the rows and use “Bulk edit parameters”. With the same window you can also change the division, customer, project manager and cost center of the selected projects at once.
How to load projects from a file
Press “Add from file” and follow the steps on the Admin Settings page. “Name” is mandatory; you can also load “Outer ID / ID 2”, “Start time”, “End time” and “Workhours” (planned workhours).
Who can see and change it
“Projects” on the Admin Settings page opens for the “Administrator” role. The “Projects” page in the Planning menu is also visible to the “Observer”, “Agronomist”, “Power user” and “Project Manager” roles; there, the “Administrator” and “Project Manager” can add and change projects, and the “Edit” button is hidden from others. If “Users have by default create privilege” is ticked in the company settings, other users, except “Observer” and “ARIB employee”, can also add a new project and change a project they added within 48 hours of adding it.
Tips
- Work and workers that are added are linked to the project. This narrows down the options in the mobile app: if the worker selects the project first, they see that project’s work.
- Plan a project’s work on the Tasks and Roster timeline pages by selecting the “Project” on the form.
- Archive finished projects so that only ongoing projects are in the options.
API calls on this page
For integrations and AI assistants: this page uses the following Terake API calls. The full description is in the API reference.
When the page opens:
GET /api/projects– Projects list
Adding, changing and deleting (from the API description):
DELETE /api/projects/{id}– Delete Project by ID or UUIDPOST /api/projects– Create or modify a ProjectPUT /api/projects/{id}– Modify a Project
Other calls from this screen’s dialogs and actions (from the web client’s code):
DELETE /api/project-resource/{resource_type}/{project_id}/{resource_id}– Removes a resource from a Project, together with its QR image and preferencesGET /api/office-hours– Office hours in periodGET /api/project-resource/{resource_type}/{project_id}– Project related Resources collectionGET /api/project-resource/{resource_type}/{project_id}/{resource_id}– Project statistics row for one resourceGET /api/projects/{id}– Project by IDGET /api/appsettings/visiblefields/{tablename}– Visible columns of an admin UI tablePOST /api/project-resource/{resource_type}/{project_id}– Creates or modifies a Project resourcePUT /api/project-resource/{resource_type}/{project_id}/{resource_id}– Modifies a Project resourcePUT /api/appsettings/visiblefields/{tablename}– Saves which columns are visible for a table in the admin UI