On the “Shifts” page you describe recurring worktime patterns (e.g. morning shift, night shift) used when making the work schedule. When a shift is selected for a schedule entry, the start and end times and the breaks are taken from it, and if needed also the worktype, place of work and other data set for the shift. The page is used by the administrator. The list and “Bulk edit parameters” are described in general on the Admin Settings page.
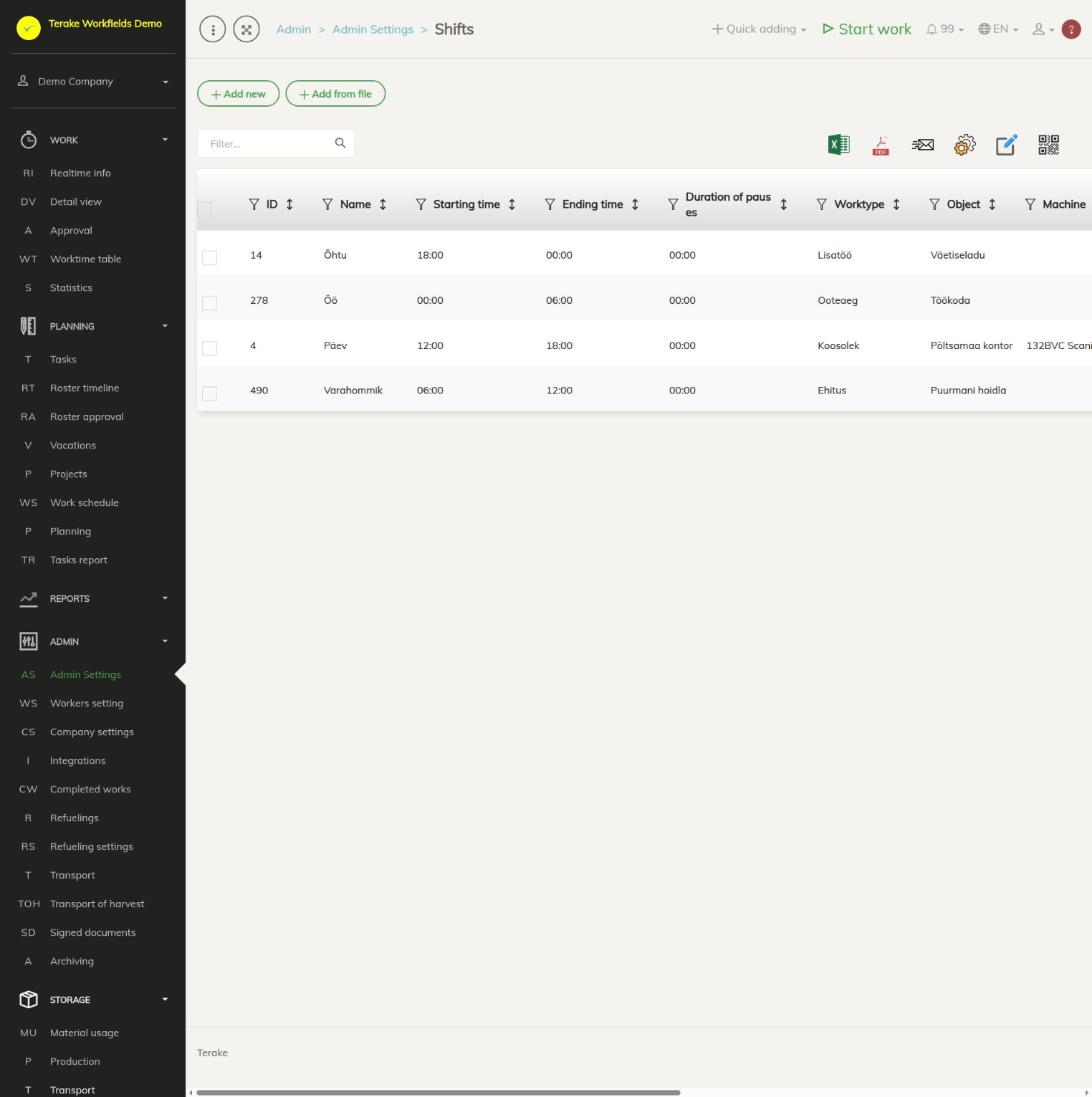
Page layout
- The “Add new” and “Add from file” buttons. This page has no archived list.
- Table columns: “ID”, “Name”, “Starting time”, “Ending time”, “Duration of pauses”, “Worktype”, “Object”, “Machine”, “Cost center”, “Project”, “Maintenance unit”, “Abbreviation”, “Division / department” and the shift’s colour.
- Clicking a row opens the “Edit shift” window. The bin button on the row deletes the shift.
- The “Generate PDF with QR codes” icon above the table makes a printable file of the shifts’ QR codes.
How to add or change a shift
- Press “Add new” or click the shift’s row.
- Select the “Starting time” and “Ending time” (mandatory, in 15-minute steps; you can also type the time).
- Select the “Duration of pauses” (hours and minutes, in 5-minute steps).
- Enter the “Shift name” (mandatory).
- If you wish, select the “Color”, “Abbreviation” and “Division / department”.
- If you wish, select the shift’s default work data (see below).
- Press “Save” (the window stays open) or “Save and close”.
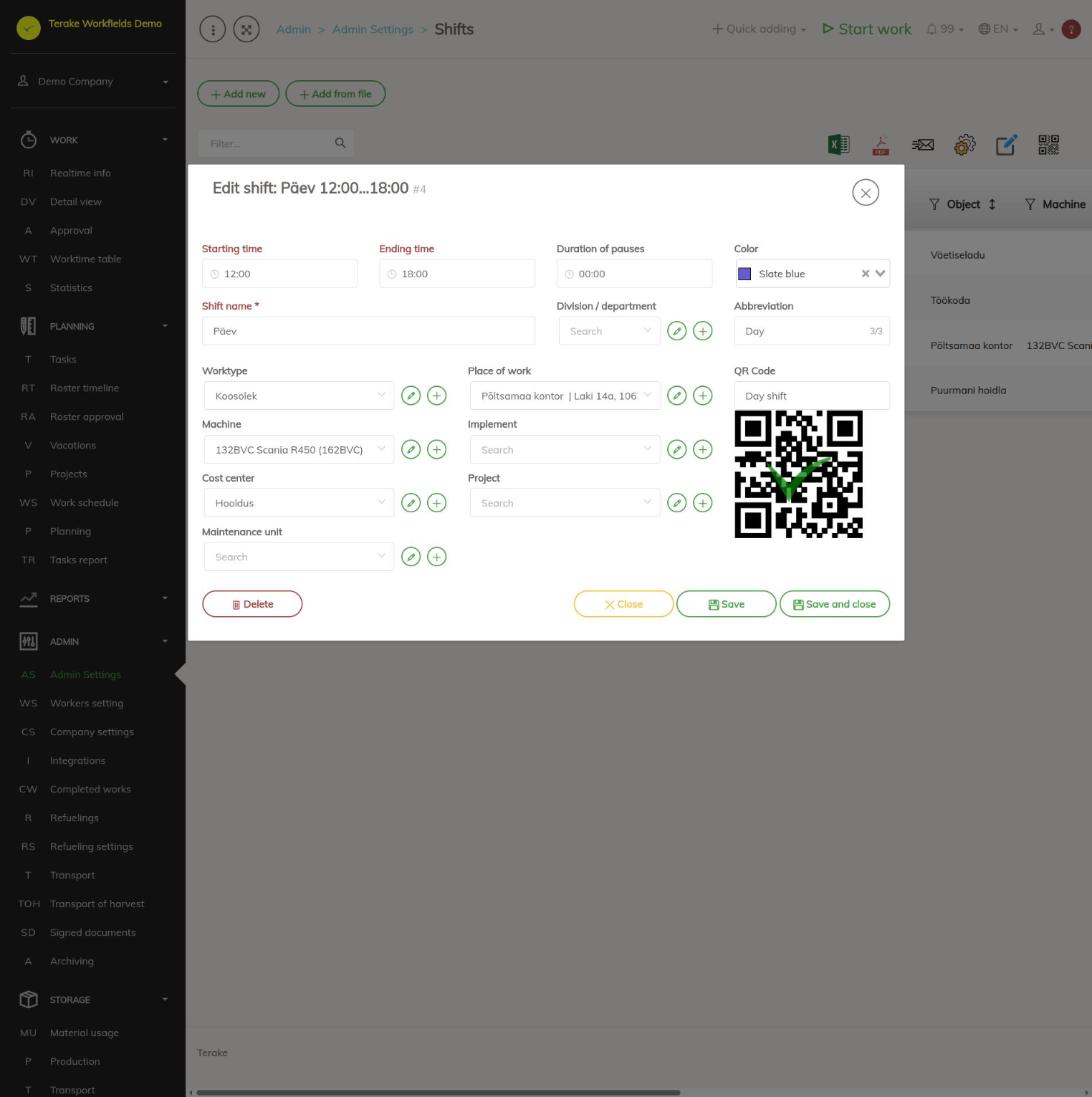
Shift fields
- Starting time, Ending time: the shift’s clock times. For a night shift, the end can be earlier than the start; the shift then ends on the next day in the schedule.
- Duration of pauses: the total break time entered on the schedule entry.
- Color: the colour the shift is shown in on the calendar.
- Shift name: the name shown in the shift options in the schedule.
- Division / department: the division the shift belongs to.
- Abbreviation: up to 3 characters. In the schedule’s calendar views the event title shows the abbreviation, or the shift name if there is none.
- Worktype, Place of work, Machine, Implement, Cost center, Project, Maintenance unit: the shift’s default work data. The form shows the fields that are made visible in the calendar event form settings (“Displayable data fields”).
- QR Code: the text of the QR code. The code lets you select the shift in the mobile app with a QR code. A new shift has the “Fill QR Code” button; the QR image appears after saving.
How shifts are used in the schedule
- When adding a work schedule entry, select “Work schedule” as the event type and the shift you want in the “Shift” field.
- The shift’s times and breaks are entered on the entry.
- If the entry has no worktype yet (or you are filling a schedule template), the shift’s worktype, place of work, machine, implement, maintenance unit, project and cost center are also entered on it.
For more details, see Roster timeline and Work schedule.
How to delete a shift
Press “Delete” in the edit window or the bin button on the row. You can delete or archive several shifts at once with “Bulk edit parameters”. Schedule entries made earlier stay.
Who can see and change it
The page is in the Admin menu and opens only for the “Administrator” role, who can add, change and delete the company’s shifts. No other role gives a separate right to add or change shifts. If “Users have by default create privilege” is ticked in the company settings, other users, except “Observer” and “ARIB employee”, can also add a new record with the plus button next to the “Shift” selection field on forms on other pages and change a record they added within 48 hours of adding it.
Tips
- Give shifts clear abbreviations and different colours so that the schedule is easy to read in the calendar view.
- If a shift always has the same work or place of work, set them on the shift so that you do not have to select them for each schedule entry.
API calls on this page
For integrations and AI assistants: this page uses the following Terake API calls. The full description is in the API reference.
When the page opens:
GET /api/shifts– All Shifts list
Adding, changing and deleting (from the API description):
DELETE /api/shifts/{id}– Delete ShiftPOST /api/shifts– Create ShiftPUT /api/shifts/{id}– Update Shift
Other calls from this screen’s dialogs and actions (from the web client’s code):
GET /api/shifts/{id}– Get Shift