“Fieldwork plan admin” is the page for changing a single fieldwork plan: here you set the plan’s work, fields and materials. The page opens on the Fieldwork planning page with the “New agrifield work plan” button or “edit” on a plan. The page is used by “Administrator” and “Agronomist”.
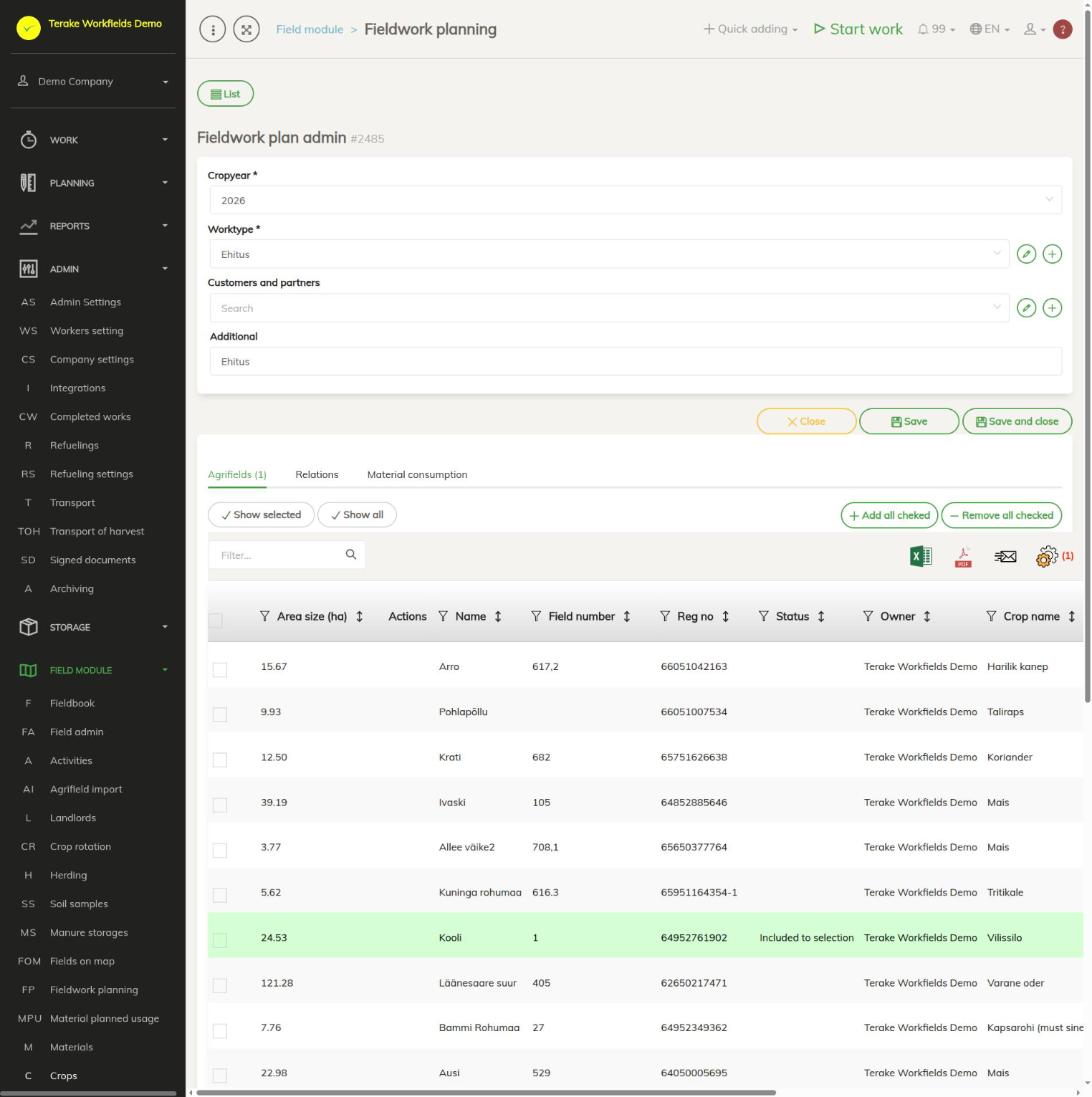
Page layout
- “List” takes you back to the overview of plans.
- At the top are the plan’s main data and the buttons “Close”, “Save” and “Save and close”.
- Below are the tabs “Agrifields”, “Relations” and “Material consumption”. The number in a tab’s title shows how many fields, relations or materials the plan has. The tabs appear only after the main data has been saved for the first time; before that you see the message “Please save main data to continue”.
Main data
- “Crop year” (required): the crop year whose fields the plan concerns. It determines which fields, crops and applicants you see on the tabs.
- “Worktype” (required): the planned work, for example sowing, fertilizing or plant protection.
- “Customers and partners”: the customer the work is done for (optional).
- “Additional”: free text shown on the plan’s card in the overview.
“Save” saves and keeps the page open; “Save and close” saves and takes you back to the overview.
How to select the plan’s fields by relations
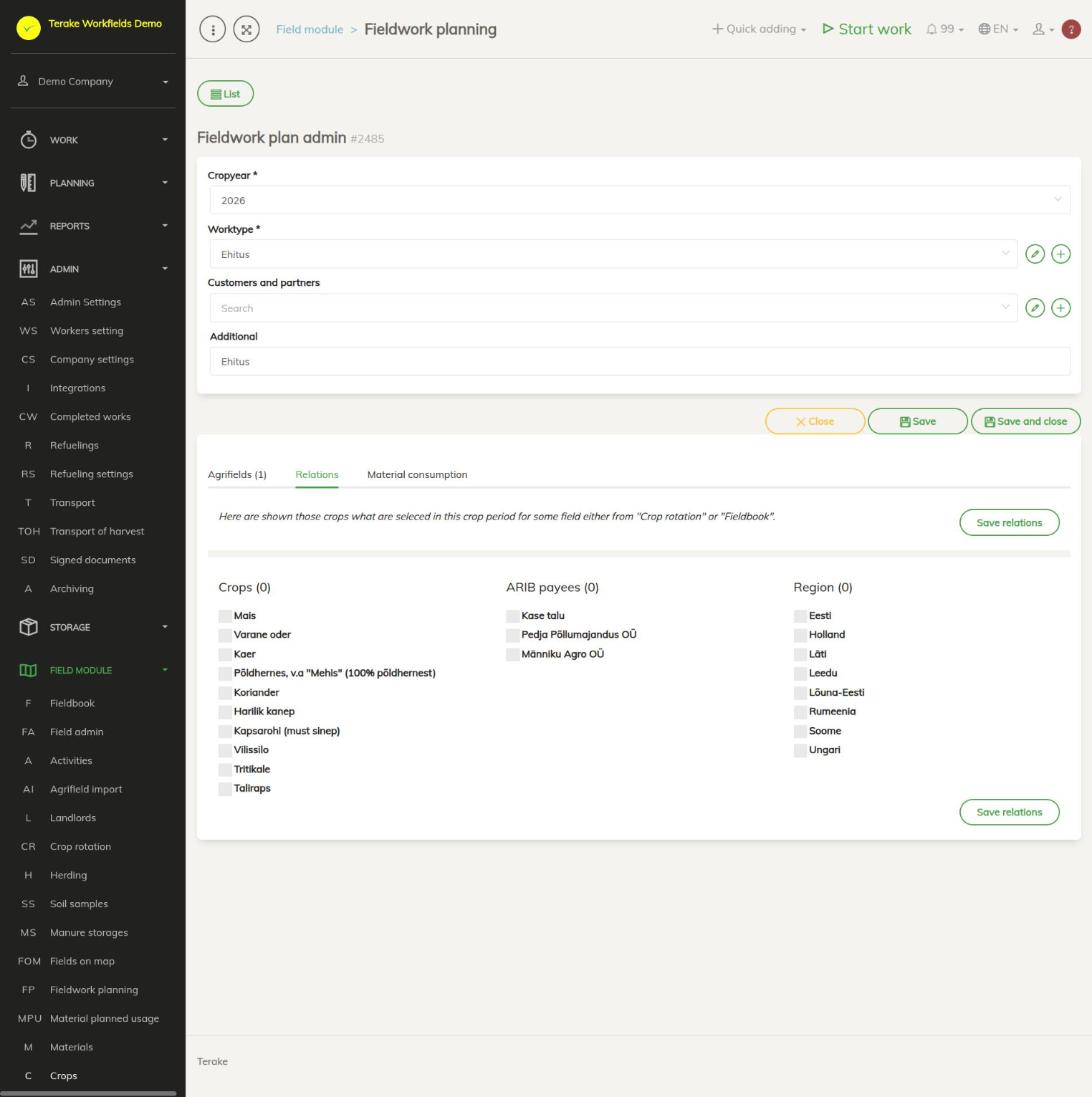
- Open the “Relations” tab. The choices are the crops and PRIA applicants assigned to some field in this crop year on the Crop rotation or Fieldbook pages, and the company’s regions. PRIA is the Estonian Agricultural Registers and Information Board (shown as ARIB in the English interface).
- Tick the values you want in the “Crops”, “ARIB payees” and “Region” blocks.
- Press “Save relations”.
After saving, the plan’s list of fields consists exactly of the crop year’s fields that match the selected relations: within one block one matching value is enough, while the conditions of different blocks must all hold at the same time. If no relation is ticked, all the crop year’s fields go into the plan. Fields removed from the plan by hand stay out even after the relations are saved, whereas fields added by hand are replaced by the fields found through the relations.
How to add or remove fields by hand
- Open the “Agrifields” tab. The table holds the crop year’s fields with the columns “Area size (ha)”, “Name”, “Field number”, “Reg no”, “Status”, “Owner”, “Crop”, “ARIB applicant”, “Region” and “Customer”.
- “Show selected” shows only the fields that belong to the plan, “Show all” shows all fields.
- Tick the fields and press “Add all checked” or “Remove all checked”.
In the “Status” column, a field that belongs to the plan shows “Included in selection” (the row is green) and a field removed by hand shows “Removed manually”. This plan’s task for a removed field is deleted if it has not been done yet.
How to add materials to the plan
- Open the “Material consumption” tab.
- Select “Material” (required), enter the “Ratio per unit” per hectare and, if needed, select the “Storage” the material is taken from.
- Press the save icon. The material appears in the table with its rate, unit and storage. Adding the same material again changes its rate.
- To remove a material, press the bin icon on its row.
Adding a material, changing its rate and removing it also apply to the plan’s calendar tasks that have not been done yet. You can see the planned material quantities on the Planned material usage page.
Who can see and change it
The page can be opened by “Administrator” and “Agronomist”. You can only change your own company’s plans.
Tips
- The fields table contains only the crop year’s fields that have both a crop and a PRIA applicant set. If a field is missing, set them on the Crop rotation or Field admin page.
- You move the plan’s fields to the calendar in the overview with the “Add fields to calendar” button on the plan’s card, see Fieldwork planning.
API calls on this page
For integrations and AI assistants: this page uses the following Terake API calls. The full description is in the API reference.
When the page opens:
GET /api/agrifieldworks/agrifields/{crop_period_id}– Fields of one crop period, marked for one planned jobGET /api/agrifieldworks/{id}– One planned field job
Adding, changing and deleting (from the API description):
DELETE /api/agrifieldworks/{id}– Delete a planned field jobPOST /api/agrifieldworks/{id}/materialusages– Add or change a planned material inputPOST /api/agrifieldworks– Create a planned field jobPUT /api/agrifieldworks/{id}– Modify a planned field job
Other calls from this screen’s dialogs and actions (from the web client’s code):
DELETE /api/agrifieldworks/{id}/materialusages/{material_usage_id}– Remove a planned material inputGET /api/agrifieldworks– Planned field jobs of one crop periodGET /api/agrifieldworks/classificator/{crop_period_id}– Crops, PRIA payees and location areas in use on one crop period's fieldsPUT /api/agrifieldworks/{id}/agrifieldsoperation/{action}– Add, exclude or clear one field in a planned job's selectionPUT /api/agrifieldworks/{id}/joinagrifield/{agrifieldid}– Add one field to a planned jobPUT /api/agrifieldworks/saverelations/{id}– Replace the relations that select a planned job's fieldsPUT /api/agrifieldworks/set/{id}/agrifields– Add fields to, or exclude them from, a planned job